The 4WD transfer case has been around for decades. In the beginning, it started out as simple power dividers that were mounted to the back of the transmission that allowed the driver to send power to both the front and rear axles, which gave the vehicle the traction to move in snow or off road. The early designs used manual locking hubs on the front axles to allow the driver to disconnect the power flow to the front axle improving fuel economy.
Most of the vehicles they were used on were work or recreational vehicles and the driver manually shifted the transfer cases. Typically they had a 2WD position, a 4WD High position, Neutral (in the transfer case) and a 4WD Low position that was used for off road driving with a 2.5-1 gear reduction. The early units were heavy cast iron designs that went away in the 1970s with the gas crisis. From that point on, manufacturers specified aluminum or magnesium cases to reduce weight and increase fuel economy as gas prices climbed.
We now saw the production of “active or automatic” transfer cases that were computer controlled and responded to driver input through the electronic buttons in the cabin. These late model transfer cases can be driven in a “Auto 4WD” mode that permitted the computer to engage the transfer case when it read a difference between wheel speeds (a slip) and split torque between the front and rear wheels without the driver doing anything. We have arrived at this point and transfer case diagnostics became more difficult and complex. This also created problems where the driver would attempt to drive the vehicle in an improper mode causing crow hop and driveline windup, due to improper use of the transfer case.
Basic Transfer Case Operation Rules
First, 4WD High and low ranges are only to be used in snow or icy conditions, or off road on dirt, grass, sand, etc. and never on dry pavement. Driving in a locked 4WD high or low range, creates a bind up in the drive train due to differences in wheel speed in turns. Because the tires cannot slip on dry pavement, there is no way to release the bind in the components until they release with a bang, or the vehicle crow hops around corners. 4WD High and Low ranges are “partial” and must be used accordingly.
Second, AWD and units equipped with Automatic 4WD can be driven on dry pavement.
Third, 4WD low cannot be engaged with the vehicle in motion and the transmission in gear. The low ratio is achieved using a planetary gear set which is not synchronized, and the gear train will grind and be damaged if not shifted when stopped with the trans in neutral.
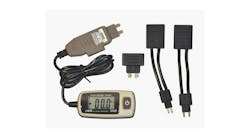
Fourth, tire size has now become a critical issue. When diagnosing any transfer case and especially the active clutch driven and viscous coupling models, the first diagnostic step is to measure the tires. You can do this by setting the vehicle up on a lift and measuring the tires with a tape measure around the center of the tread on all four wheels. Or you can buy a “stagger gauge” (Figure 1), which is a direct reading caliper that is placed on the tire at the centerline and will give a quick, direct reading and a big savings on labor time.
Any way you do it, the tires must all measure within ¼ inch of each other and be at the same tire pressures all around. Active transfer cases measure the wheel speed on each wheel. If there is a difference over ¼ inch, the computer senses a slip and activates the transfer case. Forget what the sidewall labels say, as four brand new tires can measure differently when aired up. You can fry a brand new viscous coupling in 40 miles if the tires are wrongly sized, which means that you lost money on the job.
Tire sizes are also critical in front wheel drive transmissions and the longevity of the standard differentials. The internal diff in a front wheel drive trans and a conventional rear end is not supposed to work in a straight line of travel. The differential is only supposed to work when the vehicle is in a turn, to allow the outside wheel to turn more than the inside wheel. If the tires are not equal in size the diff is always working, even in a straight line. This will inevitably damage the side gear and pinion gear washers in the diff leading to early failure. A great example of this is a customer who gets a flat, changes the tire to a “donut” type of spare and drives at highway speeds for 300 miles, usually destroying the trans, rear, and everything in between.
Fifth, correct lubrication fill is a must. Many clutch driven transfer cases require specific fluid types and putting in the wrong lube will create a nasty clutch chatter as the coefficient of friction for the clutches is incorrect. Another lube issue is misting. Many nonclutch transfer cases are spec’d to use ATF. The problem that occurs here is that as the chain and components turn the ATF becomes a mist and exits the transfer case through the vent. No customer is going to get under the vehicle regularly to check the fluid in the transfer case, and it will run dry with no visible leaks, turning the unit into non re-buildable junk. The move to make on these types of nonclutch transfer cases is to fill them with 5W30 motor oil, which is higher viscosity and will not mist.
Sixth, transfer case diagnosis has now become as complex as the transmission. Some of the active late model computer controlled units can throw as many as 30 diagnostic codes. This means work with a good service manual, wiring diagrams, and an interactive scanner to locate and cure the problems. Do not be too quick in pulling out the transfer case, as the vehicle is the only dyno you have. Once you have checked the fluid levels and the tire sizes and pressures, you must follow the theory of operation and the diagnostic trees to determine the problem before you yank the unit. We sell about 50 remanufactured transfer cases a week and 10 percent of the cores that come back on average, have nothing wrong with them. This leads to a call to our customer technical hotline that begins with “your unit is doing the same as the old one…” We then walk the installer through the diagnosis to find the real source of the problem, which is usually a bad harness, corroded wiring, noisy or bad front or rear differentials, or computer control issues.
Seventh, some states require emission tests and annual vehicle inspections that require the use of a chassis dynamometer. There are many active transfer cases, transfer cases that use an internal center differentials, and many all wheel drive models cannot be driven with one axle stationary without severe damage to the transfer case. This goes for towing also with two wheels on the ground. Use a roll back wherever possible or put the transfer case in neutral for short tows to avoid internal damage.
It has been an ongoing mystery that a customer buys a vehicle, which might be the most expensive investment they will make, and they never read the owner’s manual to understand the correct operation of the vehicle. It will be found neatly wrapped in plastic in the glove box never having been read. Some shops are too quick to remove a unit from the vehicle without a proper diagnostic routine. This short cut inevitably leads to a huge waste of shop labor and time, and an unhappy ending. The modern automobile is a group of increasingly complex systems that all must function together. Developing a consistent always followed, diagnostic routine will increase profits, bring in more customers, and increase employee morale.
Subscribe to Motor Age and receive articles like this every month…absolutely free. Click here