We usually do our best and most efficient work on vehicles with which we’re familiar, but there are times when even the ones we know the best can smack us around – particularly if we make the wrong choices. But in the midst of troubleshooting and repair, we usually learn the most from our errors. An old cowboy proverb I read years ago can be paraphrased by the statement that we usually learn good judgment after having experienced the negative results of bad judgment. In the world of automotive electronics, that good judgment learning curve can be deep and steep, even if we’ve already fixed a multitude of vehicles, and I’ve been in this business for more than 40 years now.
The F-150 and the not-so-perfect storm
A 2003 four-wheel drive F-150 5.4L with 213,654 miles was one of those bad-judgment learning curves. Sometimes trying to save a customer some money costs us a heck of a lot of work. This was a windshield wiper concern. How hard could it be? Somebody had already replaced the multi-function switch, too.
For the last 20-plus years on these F-150s, the wiper system has its switch (part of the multifunction switch) wired to a dedicated control circuit in the Generic Electronic Module (GEM), and three relays in the underhood fuse box; one for low speed, one for high speed and a third relay for the washer motor. The algorithms in the GEM module software are supposed provide the relays with their marching orders based on the chosen switch position.
The wiper switch portion of the GEM module’s IDS datastream screen is a long tracking bar that has failure areas on each end and normal switch positions in the middle. As we cycled the switch through its positions, the IDS put shadow tracks in all the right places and none of the wrong ones, indicating that the GEM was reading crisp, accurate commands. So far, so good, but still no wipers.
I was able to turn the wipers on by telling the IDS to activate the wiper relay, and when I then activated the speed relay, the wipers would go into high gear. When I turned the wiper relay off, the wipers would park. I could select the washer pump relay and the pump would wet the windshield with its spray.
Removing the steering column shrouds, we found the square connector crumbling, so we bought a replacement pigtail and put it in place with solder and heat shrink to no avail – the wipers still didn’t work. As an experiment, we had the parts store send a new switch, because these switches look exactly alike from year to year but are different internally – I found that out the hard way when I was at the dealer. From previous experience I discovered that a ’98 switch won’t work on a ’99 model, and so on. You must use the right switch. Period. The new switch changed nothing, so we sent it back.
So why wouldn’t the GEM activate the relays when commanded by the switch if the IDS indicated that it was receiving (and reporting) the switch commands? This had to be a problem within the GEM module, and I usually get black boxes from the salvage yard when I can, sometimes because replacement modules aren’t available at the dealer and sometimes because the replacements are so expensive. So, I gave the salvage yard the number that was on the old module’s sticker and bought a $65 used module that was supposed be the right one. The sticker on the replacement did say it was for a 4-wheel drive F-150, but it didn’t have the same prefix and suffix numbers as the original module.
We used the IDS “Programmable Module Installation” feature to save the existing module’s data in the Toughbook, and then we installed the replacement module (which rides piggyback on the fuse panel in true Ford style) and did the requisite data dump into it from the IDS. Well, we got an error message. Was this even doable with a used module? I wasn’t sure. We were in discovery mode. With the used replacement module in play, you could turn the wipers on first low and then high and they would work, but when you turned the wipers off, they would remain on high, and sometimes the washer would randomly start spraying.
I had installed new/rebuilt GEM modules like this, but this was the first time I have ever tried to install a used GEM module like this. Was it a bad idea? It was beginning to look that way.
At this juncture it was evident that this module obviously wasn’t going to work for us on this job, but it did let us know we were moving in the right direction. The salvage yard said that there was another module at their warehouse that did have the right prefix and suffix numbers, but we ran into a hiatus on that one because Michael the hurricane washed that warehouse away the next day, so we had to wait for the next GEM module. But when it arrived and we did the Programmable Module Installation again, we got a different error message and different errors. This time, the wipers worked almost perfectly but the power windows didn’t because the GEM module wouldn’t turn on the accessory delay relay. We had wipers but no windows. We So we were back to square one. The discovery was that, in this case, it would have been smarter to begin with a refurbished module from the Ford dealer.
A ’96 Jeep Grand Cherokee
This Jeep wasn’t a discovery and judgment case, but it bears mention. It came to us with a non-functional A/C system and no compressor operation. This was The Neutronics identifier showed us nothing but air in the system, and so we ran a 15-minute vacuum, didn’t see appreciable vacuum decay, and went on to shove the requisite amount of cold stuff into the piping. The A/C worked at this point, but we knew there was a leak somewhere, else it wouldn’t have been empty to start with.
Now that we knew the compressor and the electrical part of the A/C were operable, we pulled the cold stuff back out and used 150 psi of dry nitrogen to see if we could find a leak that way. We didn’t. So we did another vacuum, injected some dye, and recharged the system. We let it run for a bit and then shut it down to black light it for leaks, but we didn’t find any under the hood. It was time to look deeper.
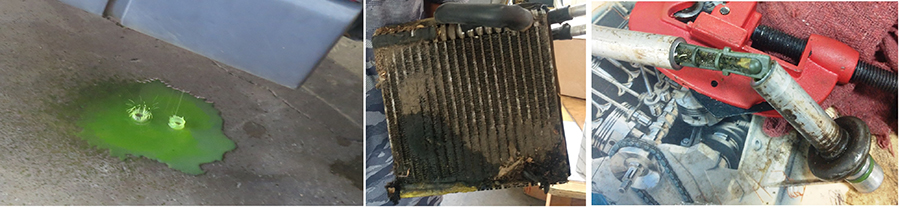
Starting the engine, we put the A/C on again and waited a bit until the evaporator started dripping, and that’s when we saw dye — a LOT of it — in the evaporator drain. Apparently, it would hold vacuum but not pressure. The customer opted for a new heater core and evaporator and we swapped both in-dash heat exchangers out, along with the liquid line, which has the orifice built in. I cut the orifice out of the old line and found that replacing it was a good move. This was the first one of these Tim had done, but he made it happen, and the Jeep has good cold air.
A 2008 Charger
This black Charger turned out to be another electronics adventure and an exercise in discovery and judgment. The complaint was that you had to attempt to start it about 100 times before it’d finally wake up and fire up; that’s the way the owner described it and that’s how I wrote it up and he somehow got it started and brought it the next morning.
Since the scan tool wouldn’t talk and the CAN bus was dead, we poked around in the schematics and determined that the Totally Integrated Power Module (TIPM) might be at fault – interestingly, the owner came up with a used one he got from somewhere and we popped it on there to no avail. Nothing changed at all.
ALLDATA Tech Assist suggested that the Wireless Ignition Node (WIN) might be at fault and said we should check power and ground at that funky little box — this is what most people might call the ignition switch, but it’s a CAN module and apparently wakes up the bus and the other modules, which it was refusing to do. It had power and ground, so we found a rebuilder in San Antonio who would refurbish it for $149 if we’d send the WIN and both fobs, so we did. When the node came back, the Dodge fired right up, but there were other issues — the door locks wouldn’t work unless the WIN (the key) was turned on. With the key on, the lock buttons and the fobs worked fine. Also, the accessory delay problem wasn’t working right – the windows and the radio always kept working even after the door was opened. Oh, and the courtesy lights wouldn’t work unless the key was on. Could the WIN be causing this? For some reason it had no idea the doors were open, and the cluster seems to be the module receiving those inputs.
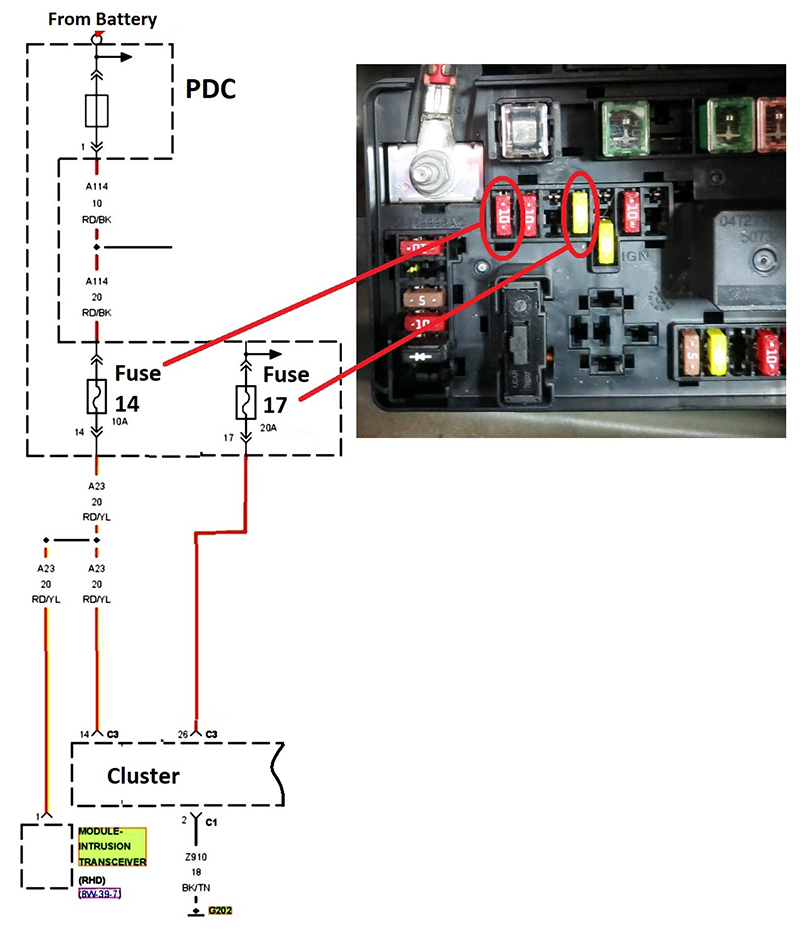
As a hail Mary pass, we ran through a check of all the fuses and found fuse 14 missing from the rear PDC (by the battery in the trunk). At that moment we didn’t know it, but when we researched, we found that Fuses 14 and 17 both feed the cluster, and when we installed the requisite 10-amp fuse in position 14 the Dodge was good to go – locks, retained accessory power, courtesy lights, everything. Somebody had planted this bug before we ever saw the car.
A 2008 Nissan Quest
This was another inoperative A/C – we had shoved some juice into this one for the first time in its life about four years ago and it had worked well until about halfway through this past summer. I threw the job at one of my folks who needed to get some A/C troubleshooting worksheets done, and I got involved after she did her preliminary diagnosis.
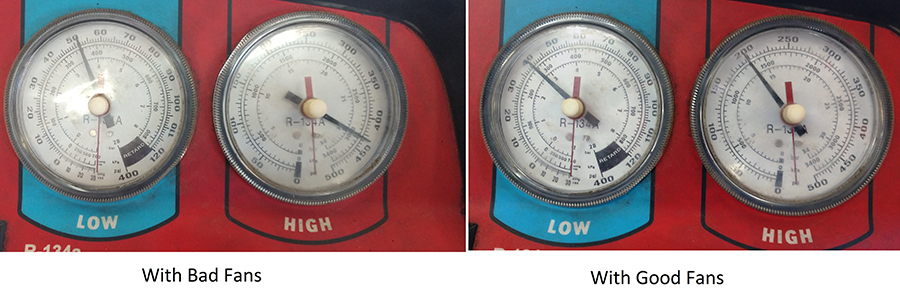
The Neutronics box had sniffed the juice and given a green light — 100 percent 134a, and when we connected the refrigerant recycler we found we had nearly 100 psi of static pressure, but when we fired up the engine and turned the A/C on, the pressures started climbing and kept going up. The high side went above 400 pounds within 2 minutes and inside, the cooling went away. We noticed that one of the two condenser/radiator fans was running slow and the other one wasn’t running at all, so we shut everything down and did a quick fan electrical test.
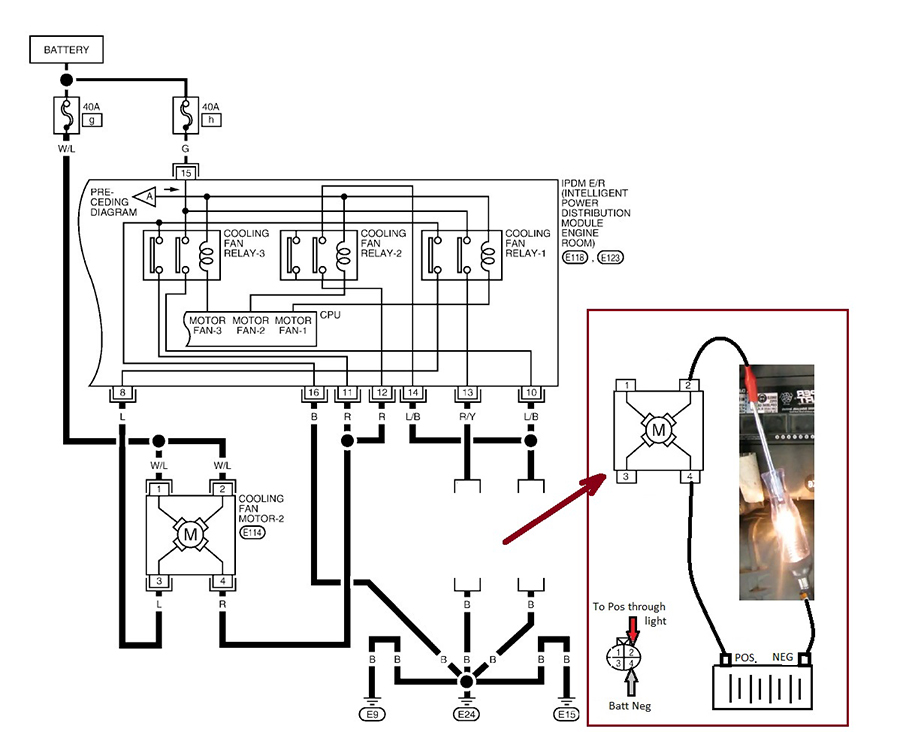
There are several ways engineers have wired two-speed fans, and this one seems to be unique to Nissan. These Nissan fans have proprietary relays with two sets of contacts and each fan has four terminals, two of them grounds, and two of them powers for controlling cooling fan speeds and so in order to do our test-light continuity test, we disconnected the condenser/cooling fan that wasn’t running and connected a jumper to one of the two ground terminals in the fan connector (NOT the harness). The other jumper was connected in series with a test light to any positive battery terminal on the motor, and as we turned the fan by hand, the light was winking off more than it was on. That’s a go-no-go fan test that’s always reliable. That one got a replacement fan and a draw-down and recharge with the right refrigerant charge and was once again a comfy ride.
The SRXs
This family has two Caddy SRX rides, a 2005 and a 2008. The 2005 came awhile back needing front shocks (the front would bounce up and down for about seven seconds on a sudden stop) and with transmission concerns — erratic shifting, and when we checked the transmission oil it looked like brake fluid, dark and strange — so we did a full fluid exchange, then followed up by yanking the pan, replacing the filter, and adding the necessary quarts for that, and those shifting problems were gone. We also popped a set of front struts on there to handle that bouncing issue.
The 2008 SRX belongs to the parents of the lady who drives the 2005 model, and she showed me a nasty clunking noise under the front end while driving around the parking lot and over small bumps as well as an inoperative A/C concern.
We didn’t see anything that was loose or needed replacing on the front end, but we did apply some heavy torque to the control arm bolts (we got a full turn on each bolt) and the clunking was gone.
As for the A/C problem, the registers were almost always hot, but sometimes they’d be nice and cool. There was plenty of good clean juice in the pipes, but no compressor operation, and our testing (scan tools and schematics) led us to the high-pressure transducer, which is very pricey and mounted just inboard of the driver’s front wheel well.
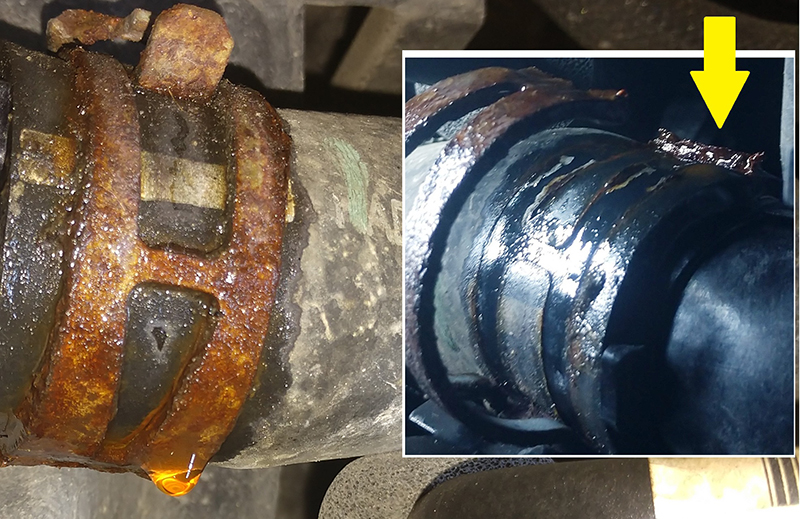
Well, while we were there, we also noticed a leaking lower radiator hose due to a rusty and cracked spring clamp (this one lives up north with the salt) and we also discovered a nasty power steering leak at the driver’s end of the steering rack. When I priced out all the repairs, rather than giving the go-ahead, this lady called her husband and they agreed together that this vehicle needed to belong to somebody else; she decided her folks needed to trade it in without making any repairs, but we did replace that broken spring clamp with a nice stainless-steel Gates screw clamp. All in all, it was a good day, I guess.


