Content brought to you by Motor Age. To subscribe, click here.
What You Will Learn:
• With practice, pressure waveform analysis will save hours of diagnostic time
• There is a wealth of diagnostic information present in both an in-cylinder pressure waveform/intake pulse waveform
• Coupling service information with diagnostic techniques is a winning combination for accurate analyses
Newly learned skills often allow for unobtrusive testing procedures that can allow a technician to disassemble only what’s needed. An example of this application of newer testing techniques is carried out below. A 2009 Chevrolet Suburban 5.3L arrived at the shop (Figure 1). According to the repair order, the vehicle was experiencing a misfire and the MIL was illuminated.
Verify the customer's concern
Walking out to the lot, I contemplated a plan of attack. Concerning misfire troubleshooting strategies, there's always a fork in the road. One path leads to a mechanical failure/cylinder wash possibility. The other encompasses all the other possibilities; air/fuel concerns, ignition, electrical, etc. Oftentimes, the injector of a misfiring cylinder is disabled, preventing cylinder wash under weak/no spark conditions.
Not everyone agrees with that being the first step. I do it because mechanical failures are typically a facile verification, but their repairs can be the costliest of misfire causes. Traditionally, I'd troubleshoot misfires commencing with spark, then fuel, and finally compression, only to find out many times that mechanical integrity was amiss. After all that diagnostic time invested, the client would be informed of the necessary repairs but frequently decline them.
Luckily, this vehicle allows for a "clear-flood” mode. Upon cranking the engine under wide-open throttle (WOT) conditions, the ECM will cut off the injector command across all cylinders, allowing for indefinite starter operation.
Theoretically, each compression stroke loads the starter equally. I listened to the relative compression from each cylinder via the rhythm it produces while cranking. A failing result is an audibly uneven rhythm.
Once I heard the irregular cranking rhythm, I released the throttle, the engine started, and I could hear/ feel a "dead" misfire (along with the MIL on), verifying the client’s concerns. A DTC scan revealed a lone P0306 - Cylinder #6 misfire. Nonetheless, I wanted to verify whether the ECM cylinder identification was accurate.
Synchronized relative compression test
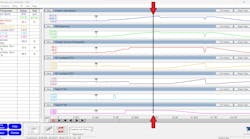
Synced to coil #1(utilizing a secondary ignition lead), and with an amperage clamp around a battery cable, the relative compression (RC) test showed a visual representation of the test I did listening to the cranking rhythm (Figure 2). The firing order is necessary to decipher which amperage/compression peak correlates to which cylinder.
Looking at the waveform, compression within cylinder #1 was not looking too good, and cylinder #6 had a significant compression loss (although our scanner indicated a misfire for only cylinder #6).
It would have been foolish of me to assume that because we had a lack of cylinder compression it was necessarily a mechanical failure. My next step is always to rule out cylinder wash. Every piston has a thin protective oil film between its rings that isolates the combustion chamber from the crankcase. "Cylinder wash" is when liquid fuel dissolves that oil film, which results in insufficient ring sealing. Excessive combustion gasses and raw fuel enter the crankcase and cylinder wall/ring damage ensues. In severe cases, bearing/piston failure follows.
I didn't smell any fuel odors at the dipstick. Nonetheless, I attached a piezoelectric (pulse) sensor to the dipstick tube, which confirmed no sign of combustion leakage into the crankcase from cylinder wash during this second RC test. Now, I had deduced a mechanical integrity issue. At this point, any time being spent chasing ignition or air-fuel ratio faults would be fruitless.
I could have easily stopped there, having ruled out a lower end sealing issue, sent out the cylinder heads for service, and be done. But this is about growing our knowledge base, so consider what may be learned.
The intake pressure pulse
I continued testing by moving the piezo sensor to the intake manifold in place of the brake booster. If you've never used a pulse sensor, this sensor reacts to changes in pressure. In the same way a relative compression test measures theoretical compression differences across cylinders, the intake pulse test measures theoretical intake pull (contribution) differences across cylinders.
Employing the clear-flood mode, I attempted a third relative compression test to no avail. Due to a lack of air restriction (that would have been provided by a closed throttle blade), the intake pulse waveform was rendered unusable. I had a cap nearby that usually accompanies a smoke machine. I placed it over the throttle body to recreate the air restriction and repeated the RC test. I then deployed vertical rulers.
In my case, eight partitions (8-cylinder engine) keep everything easy on the eyes. Using a piston chart acquired from Driveabilityguys.com, we're allowed to observe each piston direction and its respective stroke within a 720-degree cycle (Figure 3).
The fault could not have been clearer! But of course, the ability to acquire the waveform and pinpoint the fault only emerged because of what I had learned in the classroom. Before taking (Motor Age Technical Editor) Brandon Steckler's "Pressure Waveform Acquisition & Analysis: From the Inside Out" class, I had never laid eyes on such a waveform, nor what was needed to acquire and dissect it.
While viewing the capture in figure 3, I had noticed that the #1 RC peak was much improved from the previous RC tests. Compression at cylinder #1 is acceptable at this point. One shouldn't put all their eggs in one basket, nor should we commit to only one test, especially the RC test, because of several variables.
So far, I've conducted the relative compression test thrice. The first was the synced relative compression test. The second was with my pulse sensor referencing the dipstick (mentioned earlier). Finally, the third test is one which includes the pulse sensor measuring intake pulses, which I will dissect.
The piston chart
I'll admit the piston chart was daunting at first. My head was spinning! But with a bit of practice, it became invaluable. So I then overlaid some data to clarify what I was looking at.
Starting from the top of the waveform, on the left side of Figure 3, each cylinder’s top-dead-center compression stroke (TDC-C) peak is marked in black on our blue amperage waveform, per the firing order. Beneath that is our green intake pulse waveform, also following the firing order, but instead begins with cylinder #6 (cylinder #1’s companion cylinder). I then referenced the piston chart.
The cylinder #1 cycle: The TDC-C peak lines up at the beginning of the red power stroke box (“P”), at the very top of our piston chart. That commences with our four-stroke cycle and continues horizontally onto a brown exhaust stroke box (“E”), a blue Intake stroke box (“I”, 360 degrees after TDC-C), and ends with the green compression stroke box (“C”). Completing the 720-degree cycle for cylinder #1. The other cylinders follow suit but are simply offset from each other.
Observing the intake pulse waveform (in green), note that each intake pull is lining up with its corresponding cylinder when the exhaust valve closes (EVC). Keep in mind that during the exhaust stroke, the intake valve opens and overlap occurs (the intake and exhaust valves are open simultaneously). At top dead center of the exhaust stroke (TDC-E), EVC then takes place, allowing for the intake pulls to occur (Figure 3-right). All the TDC-C events have been identified along with each respective intake vacuum pull event.
Analysis
One thing I always keep in mind is never to forget the suspect! Cylinder #6 has been established as the suspect cylinder. The question should always be, “What is the suspect cylinder doing (at every point in the piston chart)?” Is the suspect cylinder piston ascending or descending? On which stroke (ascending; compression or exhaust?... Descending; power or intake)? A ton of headaches will be avoided if we simply do not lose sight of our suspect.
At this point it should be pretty obvious, the nonexistent intake pulls after #6 EVC. A missing pull has occurred. Followed by a deep pull after #5 EVC (which I had no explanation for). After consulting with Brandon, it turns out that this deep pull is a characteristic of the sensor we are using, a delta sensor (Piezoelectric device). The intake pressure became stable during the absent intake pull (the sensor then "relaxed") and was followed by a rapid change in pressure after the #5 EVC, resulting in a seemingly "deep" pull.
Why aren’t all of the good pulses even?
One more variable to consider is the affect that crank rotational speed has on the intake pulse waveform (Figure 4). During a low/no compression event (cylinder #6), the crankshaft rotation momentarily speeds up (lacking compression-load) until it encounters a good compression-load from cylinder #5 (the subsequent cylinder in the firing order).
When you observe the intake pulse directly below that event, the intake pulse appears as if each consecutive cylinder is pulling more and more as the crank speeds up. Then, as the crank slows, the intake pulse exhibits that each cylinder is pulling less and less. However, my concern remains with the lack of intake pull correlating with cylinder #6 EVC (which, of course, would have resulted in a “passing" leakdown test).
Suspecting that the intake valve was simply not opening, one could've easily stopped there and moved onto a teardown-approval from the client. But I'm always learning and will use this as an opportunity to invest in my experience. I proceeded to go in-cylinder with the Pico WPS 500X pressure transducer into cylinder #6.
In-cylinder pressure testing
I began with an in-cylinder (clear-flood mode) cranking capture, followed by a running capture (Figure 5). Taking a look at my cranking capture, something stands out to me. Remember the throttle blade is wide open/uncapped and I've measured 22 inHG during its intake stroke. (Figure 6).
Two things are true about WOT cranking compression waveforms:
- Cranking engine speed is simply not fast enough to displace the air necessary to cause a vacuum as deep as a running engine will.
- With a WOT blade, there’s inadequate air restriction at play to allow for vacuum to generate.
The 22 inHG during the induction stroke and the rounded profile of the compression waveform’s intake pocket are consequential to piston ascension/descension against a closed/sealed intake valve. This result is in a peak cranking compression of only about 40 psia. The cylinder couldn’t fill appropriately. It's safe to say that the exhaust plateau, created by the lack of intake valve opening (IVO) in a cranking waveform) visually resembles the characteristics of a good running waveform.
Speaking of which, the running waveform had a peak compression of about 2 psi and a clearly defined EVO/EVC (Figure 7). When EVC occurs, the cylinder is sealed, but the piston is still ascending and the pressure increases (slightly before TDC-E). This is then followed by the piston descending, after TDC of the exhaust stroke (ATDC-E) and a rounding of the intake pocket occurred.
But there is something that stands out to me, and that is the pressure loss (to near barometric pressure) during the exhaust stroke, where IVO should occur. There's only one logical conclusion that I can come up with for this "dip in pressure” to occur. I can only surmise that during running conditions, the intake valve opens momentarily (ever so slightly), which vents the pressure. This is important because it steers me away from a cam lobe problem. I’ll explain the reason why shortly.
Armed with this data, we explained to the customer that removal of the valve cover was not only justified, but necessary. And that at this point we're expecting to see two things; No intake valve operation, and also good exhaust valve operation (this will become relevant soon).
I’m going in!
With the valve cover removed and the engine cranking, an inoperative intake valve and an properly operating exhaust valve are observed. This is important to note because this vehicle incorporates an AFM (Active Fuel Management) system, otherwise known as "cylinder deactivation."
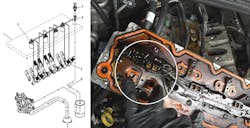
Service information reveals that four cylinders can be deactivated upon ECM command, using special lifters, oil passages, and four solenoids that are part of the VLOM (Valve Lifter Oil Manifold) assembly (Figure 8).
The ECM accomplishes this by grounding the command side of the solenoid. While energized, the solenoid opens its valve, allowing for pressurized engine oil to enter both the intake and exhaust valve lifter bores simultaneously, ergo, deactivating that cylinder. This is a pretty big deal since (depending on the scenario) it can lead to a misdiagnosis, if disregarded.
Is the AFM solenoid the root-cause fault?
Since cylinder deactivation is achieved with pressurized oil, one can simply remove that from the equation (since the engine not running). If the issue was a stuck-open AFM solenoid valve, the inoperative intake valve should become operational when oil pressure is not available. So, I cranked the engine manually with a wrench and confirmed there was no intake valve operation.
There is another way we can rule out a stuck-open solenoid. As one solenoid controls two lifters at the same time, (Figure 8 - right side) if only one lifter was inoperative, it’s logically not likely the result of a stuck-open AFM solenoid valve. That scenario would affect both the intake and exhaust valves.
At this point, I brought my data to the client's attention and merely suggested replacing the VLOM assembly as a precautionary measure (because of its known high failure rate). I mentioned this along with the removal of the cylinder head for lifter/cam lobe inspection (the lifter is beneath the head). If one lifter requires replacement, all lifters should be replaced, according to service information.
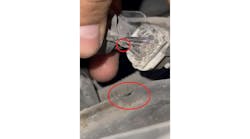
Upon approval, the cylinder heads and the suspect lifter were removed from the engine. Nothing apparent could be noted, it looked perfect from the outside. The cam lobe was also found to be in pristine condition, as suspected (Figure 9). I was left with only one logical conclusion: The lifter collapsed under the tension of the valve spring upon IVO.
This explains the "pressure dip" we saw in our running capture in Figure 7. The failing intake valve lifter collapsed and inhibited proper valve opening, but it has enough resistance to overcome the valve spring tension (just enough to open that intake valve momentarily). And that is why I did not previously suspect the cam lobe was worn.
Building confidence
When you pinpoint a failure, it facilitates confident interaction with the client. It's the difference between saying "it's a collapsed lifter," and saying "let's replace all valvetrain components." So, we confidently requested approval for replacing all lifters and having the heads sent out to our local machine shop, providing a warranty. The client didn't bat an eye; the repair was approved. Although we did send the heads out to the machine shop, it was simply to ensure there were no other issues that may surface late, after assembly.
After I received and installed the heads, I decided to confirm the repair before completing the reassembly. Cranking the engine manually, the #6 intake valve was now operational. A uniform cranking rhythm was heard, an even cranking amperage waveform was exhibited, and no misfires were felt. In the in-cylinder cranking waveform, the exhaust plateau was no longer present and a peak compression of 173 psia was measured (Figure 10).
Verifying the repair
Lastly, I'd like to say that if it were not for in-class training, i would still be oblivious to these testing techniques. I encourage all not only to go to training but to take advantage of every minute you spend in there. Technology will continue to advance, and so should our diagnostic process and client interaction/education.
Although I did my best to include as much information as possible, this case study couldn’t possibly substitute in-class training. It sure can give you an inside look as to what you can expect, though!


