Most tech-savvy folks know how you can make an electromagnet by wrapping insulated wire around a metal core and feeding current through the wire. And as the polarity of the electricity is reversed, so is the north/south orientation of the magnetic field. Put the magnet end to end on a spinning core in between two permanent magnets and fit it with a contact commutator with a pair or pairs of discrete contacts feeding DC current to the core. Then, when you apply power to fixed brushes sliding on the commutator, the core spins because the magnetic field in the core is constantly repelling from its like poles in the outer magnets.
Where DC brushless motors are concerned, you simply put the magnets on the part that spins. Put the electromagnetic windings on the outside, sort of like an alternator with a permanent magnet rotor, only you’re feeding the stator instead of harvesting its energy. The brushless AC motors in hybrid vehicle transmissions work in a similar fashion, but they’re fed by AC current from an inverter instead of DC. A brushless DC motor needs some electronics to make it work, because you have to feed pulses to the external fixed windings in such a way that they’re timed with the north-south swapping of the permanent magnets built into the rotor. Thus, you’re taking the DC and turning it into AC inside the motor.
Brushless DC motor electronics have to use a sensor keep up with where the rotor is at any given time, and a Hall-Effect sensor is typically used for that. Furthermore, because of the electronics, you can’t simply reverse the polarity of the current you feed a DC brushless motor and expect it to spin backwards unless its electronics have been set up to work that way.
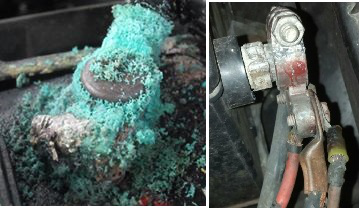
Sometimes you can see the place where voltage drop is happening. Sometimes you can’t. Back in the mid-70s when I was a teenager, I was already known to be a wrench guy, and a local farmer called on me to have a look at his Massey Ferguson tractor. It had molded battery cable ends, and they were clean and tight. The battery was new, but it wouldn’t even begin to spin. It took me about 10 minutes (with no test light or meter) to figure out that there was NO electrical connection between the positive molded cable end and the cable that was molded into it. I took the cable completely off, laid it on a part of the plow frame, and pounded it where the cable entered it with a hammer. Thus I squished the lead back into contact with the copper and got the tractor started. It was my first experience with “stealth” voltage drop on a clean cable that was factory made and looked as healthy as new.
For a more modern example of “stealth” voltage drop, I remember a brand new 2000 Mustang Cobra came in to the Ford dealer on the hook for a no-crank scenario, and when I drew the work order, I passed it along to my young protégé. He was all excited to be working on that slick red Mustang, so I let him do the job by himself.
He checked the battery and found it fully charged, then got under the car to check the solenoid wire that engages the starter. He found a nice, bright 12 volts with the key in the start position, so that ruled out a neutral safety switch issue. He figured the starter was bad, so he got a starter charged out under warranty from the parts department and busted his fanny putting it on there, only to find that he still had the same problem.
What I showed him after all his hard work was that if you connected a test light to the ground side of the battery and touched the probe to the engine block, the entire block would light up with 12 volts. He had that deer-in-the-headlights look until I explained that he had 100 percent voltage drop on the negative side of the system. The only ground path was through the test light bulb, you see, thus the electrically “hot” engine block.
That particular vehicle’s battery-to-engine ground was on the driver’s side of the block between the head and the oil pan, and while it looked clean and felt tight, all the voltage was being dropped right there. We screwed that anodized cable-to-block bolt out and saw a lot of engine paint between the cable lug and the block, and just as much in the threads where the bolt went. Wire brushing everything and cinching it back down fixed that one.
Likewise, when somebody comes with a vehicle that has a new starter and a new battery but the starter is still straining to turn the engine, grab your voltmeter and make the necessary connections to find out where the voltage is being lost. If the engine is mechanically unbound, it’s the smart thing to do. But first it’s wise to check for mechanical binding. If the starter only clicks but the battery is hot, look for things like seized A/C clutch bearings or similar water pump issues. If you take the belt off and it starts right up, find out which pulley is locking things up – and it’ll probably be one of the big ones. Sometimes the starter itself can be the cause of a locked up engine, so don’t neglect it during diagnosis.
And remember, a little-used vehicle that is only driven two or three miles each way every day may need a starter at very low mileage because, mile for mile, it has been called upon to start the engine a lot more than higher mileage vehicles.
A couple of weird ones
I guess the weirdest ones I’ve seen in a very long time was a 1997 Mazda that kept burning up one starter after another, and even a new starter would struggle to spin the engine and after a few starts, it would be destroyed. There was no voltage drop between the battery and the main starter terminal, and none between the battery and the engine block.
The voltage drop on this one was somewhere you wouldn’t expect it to be. It was in the ignition switch itself. The starter solenoid trigger feed from the ignition switch through the neutral safety switch was weak as a result, but the neutral safety switch wasn’t dropping the voltage. The Starter Cut Relay was also a possibility, but it had already been eliminated.
Because the starter solenoid wasn’t getting enough current to vigorously slap its big internal copper washer against the battery stud and its companion stud that feeds battery power into the starter, the solenoid wasn’t acting like the contactor it’s supposed to be – it was only getting enough voltage to engage slowly and to strike an arc in there time after time, which blistered and burned the washer and the studs, only you couldn’t see that happening. Thus the starter would die of low voltage sickness.
A good way to find this kind of thing is to do an overall voltage drop test between the positive battery terminal and the solenoid trigger wire, and then do it again between the battery and the post we don’t usually think about checking that feeds battery voltage from the solenoid into the starter itself. Every connection in the system is a potential voltage drop point. The moral of the story is that if the starter fails more than once, it’s a good idea to find out why. But we all know that, don’t we?
Another weird starter problem was my own 2007 Taurus. The starter died suddenly at about 100,000 miles and I was forced to jack it up in the driveway and replace it with a parts house unit from around the corner. It started flawlessly for about two months, and then one day when I slid behind the wheel to drive home, the starter motor would begin to spin as soon as I turned the key to the start position so that it was whirling full speed before it ever engaged. This bounced the starter drive off the flywheel with that startling, ear-piercing scream and no flywheel movement whatsoever.
Think about it: No starter is supposed to begin to spin until the starter drive teeth are fully engaged in the flywheel. It’s a theoretical impossibility for that to happen because the contactor we call the solenoid doesn’t even feed current to the starter motor until the drive is fully extended and engaged. Yet this one did exactly that. Another starter took care of the problem. Something had gone wrong inside the solenoid that had caused this.
The “whack it!” syndrome
Most people who drive old cars have learned to “whack” the starter if it doesn’t work, but that should be done carefully – those ceramic magnets can’t take a lot o’ whackin’ before they get to crackin’. But one day a lady came to me and said somebody had replaced the starter on her Chrysler because you had to whack it to start it, and she discovered that even after the starter was replaced, you still had to whack it about every other time to get it to start.
| A few simple tips |
|
When a no-crank isn’t starter related
For the past 10 years or so, many fairly common platforms have been giving the PCM full control of the starter, and not just on the push-button start systems, either. You simply turn the key briefly to the start position on the ignition switch and the engine starts. On a system where the PCM doesn’t wake up for one reason or another, there will be no starter operation, so don’t neglect to break out the scan tool.
I wrote awhile back about a Chrysler Crossfire that had been to the dealer for an intermittent no-crank issue, and the owner told us that the dealership service department had replaced the PCM in a shotgun attempt at repairing that concern. The repair bill was staggering from that misdiagnosis, and the problem remained.
At my shop, we analyzed the starter trigger circuit, which is a Mercedes design. The PCM is in total control of starter operation on that one. The start signal goes to the PCM and to a “Pulse Module” that relays the starter signal to the solenoid. Identifix posts favored the Pulse Module as a favorite cause, but our diagnosis found that when these no-cranks were being caused by a failure of the Relay Module, a Mercedes-made part which, among other things, contains the Engine Control and Fuel Pump relays. Our troubleshooting led us to the Engine Control relay in the Relay Module, which sometimes wouldn’t provide current to the PCM, and when the PCM is asleep, the Pulse Module does nothing. It took a $400 Relay Module, but we eliminated that intermittent no-crank problem.
On that same order, just this past week we worked out a 2008 Impala that had an intermittent no-crank issue that wasn’t starter related. This one was easy to duplicate, and while there were a few cases of underhood junction box replacements for this concern, there were just about as many bad BCMs, and it’s never a good idea to throw an expensive part without verification of what’s missing from where.
Interestingly, like the Chrysler Crossfire, it turned out that this Impala had a faulty relay that was integral to the underhood junction box, and we caught it in the act of not delivering power to wake up the PCM, first with the scan tool and then with a test light. And when we back-fed power into that circuit and verified our diagnosis, our troubleshooting was done and the Impala was out the door.


